Why use Health Checks with Azure App Service?
When running an application with Azure App Services in production, it is essential that you consider configuring a health check endpoint for your application.
As part of running a production application, you should have considered scaling out the application to run across multiple ‘instances’. How does Azure know if each of these instances are healthy; through the health check endpoint.
Once the health check endpoint has been configured the App Service load balancer will:
- Call the endpoint at 1-minute intervals
- Mark the instance as unhealthy if it doesn’t respond with a 200-299 status code after 2 or more requests
- Instances that remain unhealthy will be replaced if they don’t recover within 1 hour
- When scaling up or out, the load balancer will not route requests to the new instances until they respond with a healthy result from the health check endpoint.
The benefits are quite apparent; inform the App Service load balancer on how to monitor the health of your application, and it will ensure your users have a good experience.
How to configure the Health Check Endpoint
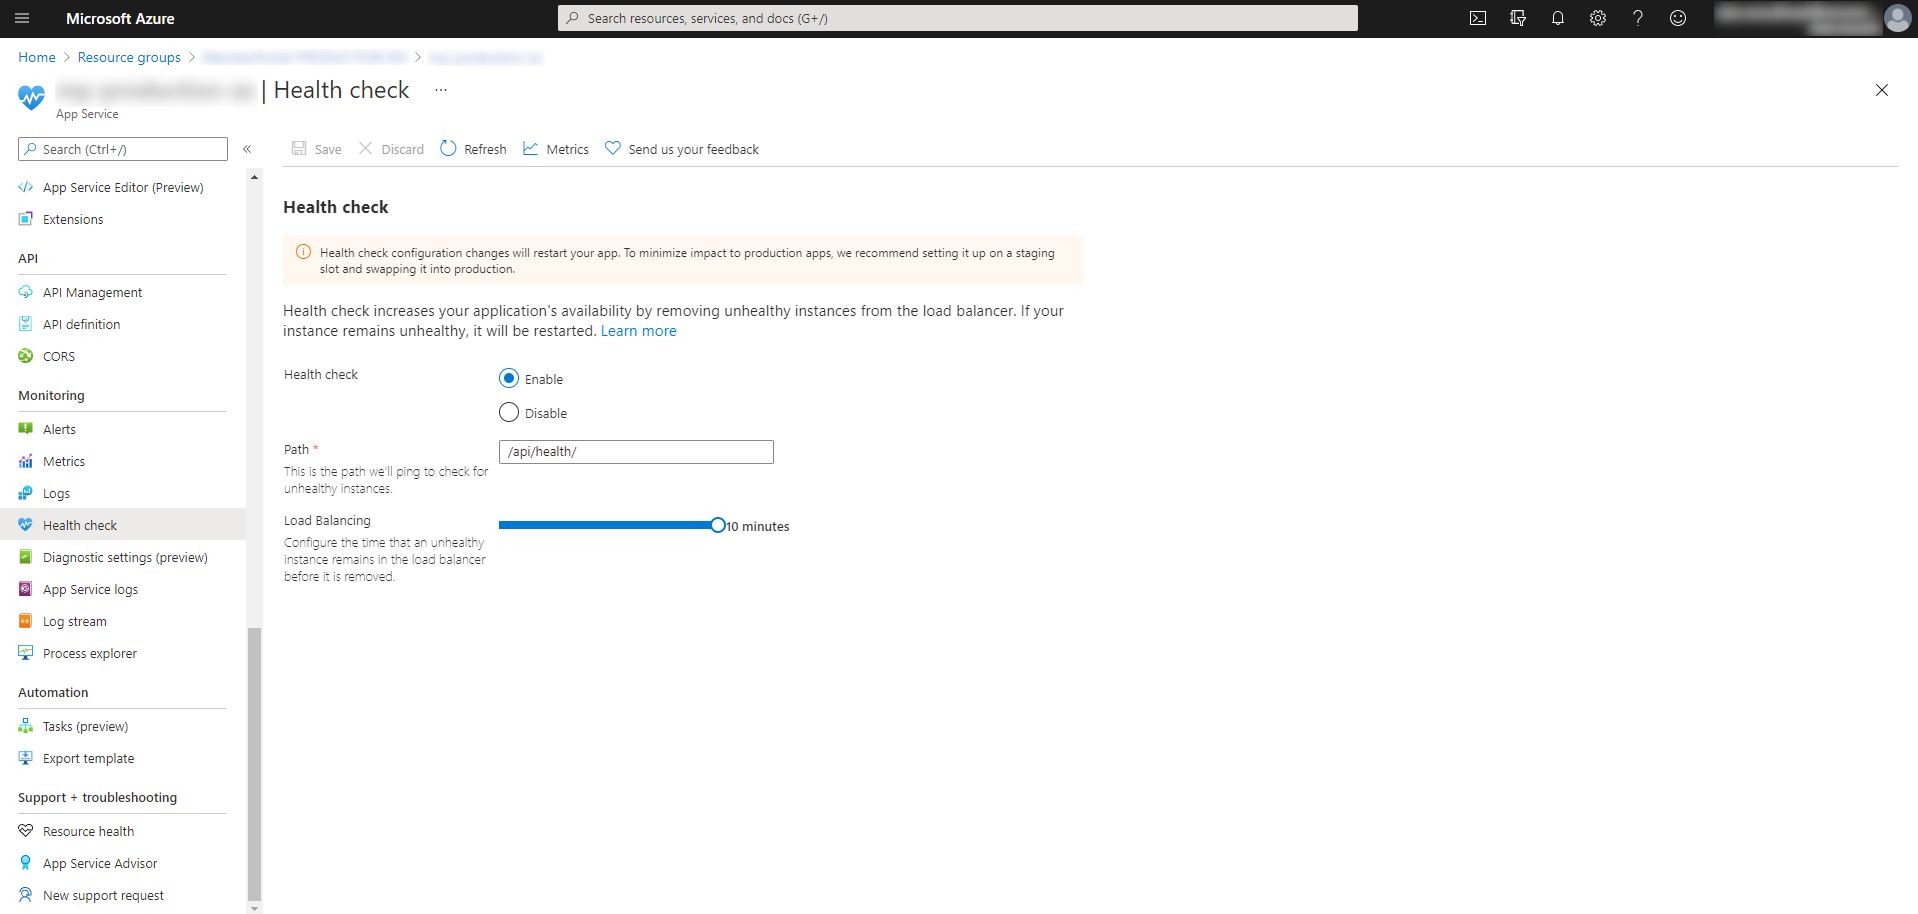
The most simple option for configuring the health check endpoint of your app service is to do so through the Azure portal. If you navigate to your App Service and select Health Check in the left-hand panel, you can give the relative url to your endpoint and select how long the load balancer will leave an unhealthy instance, before it is removed from circulation:

One of the major flaws of this approach however, is that this WILL CAUSE YOUR APPLICATION TO RESTART! Azure App Service treats any such configuration change as an application change, which will cause the restart, even though your underlying application hasn’t changed.
As part of this series of posts on Azure App Service Best Practices, I have also covered the topic of App Service Staging Slots and why you should use them. The good news is, if you apply the health check configuration to the staging slot, this will be inherited by the production slot, when swapped, and the application will not restart for your users.
To apply the configuration change to a staging slot, you can use the following Azure CLI command:
1az webapp config set -g [YOUR_RESOURCE_GROUP] -n [YOUR_APP_SERVICE_NAME] -s [YOUR_SLOT_NAME] --generic-configurations "{\`"healthCheckPath\`": \`"[YOUR_HEALTH_CHECK_RELATIVE_URL]\`"}"
Note in the above command the escape characters that are necessary for the Azure CLI to validate the endpoint set within the generic configuration JSON.
Finally, you can then swap the slot with the updated configuration with the production slot, which brings the configuration change to the application seamlessly, without downtime for your users:
1az webapp deployment slot swap -g [YOUR_RESOURCE_GROUP] -n [YOUR_APP_SERVICE_NAME] --slot [YOUR_SLOT_NAME] --target-slot production
Further considerations
I would strongly recommend that you hide the availability of the health check endpoint and return a 404 result for all traffic unless it’s from Azure itself, either localhost or from the v-net that your App Service resides on.
This can be done using the URL Rewrite module in IIS (with rules defined within the web.config file in the root of your application), which Azure App Services respects. Typically, this would be done through the use of a transform file such as below:
1<configuration xmlns:xdt="http://schemas.microsoft.com/XML-Document-Transform">2 <system.web>3 <compilation xdt:Transform="RemoveAttributes(debug)" />4 </system.web>5 <system.webServer>6 <rewrite>7 <rules xdt:Transform="Insert">8 <rule name="BlockHealthEndpoints" stopProcessing="true">9 <match url="^[YOUR_HEALTH_CHECK]" />10 <conditions logicalGrouping="MatchAll">11 <!-- Localhost -->12 <add input="{HTTP_HOST}" pattern="localhost" negate="true" />13 <add input="{REMOTE_ADDR}" matchType="Pattern" pattern="127.0.0.1" negate="true" />14 <!-- VNET IP Range for internal requests -->15 <add input="{REMOTE_ADDR}" matchType="Pattern" pattern="[YOUR V-NET IP RANGE: eg. 10.0.*.*]" negate="true" />16 </conditions>17 <action type="CustomResponse" statusCode="404" />18 </rule>19 </rules>20 </rewrite>21 </system.webServer>22</configuration>
Summary
I would strongly recommend the use of the Health Check endpoint to inform the App Service load balancer of how to determine if your application instance is healthy. Without such information, Azure App Services is blind to whether it should continue to serve traffic to an instance of your application or not.
It must be noted that without scaling out your application to at least 2 instances, then this setting will have no effect as the load balancer is disabled with only one running instance to reference.